Arrepiados (Almond Biscuits)

Arrepiados” (translated into English as “creepy”, “horrified” or “goosebumps”) are said to have originated when nuns were getting ready to welcome a group of distinguished gentlemen. In the bustle of the kitchen, where they were peeling almonds to make some cookies, a sister remarked, “Do not forget that the Clarissass (nuns of the Monastery of Santa Clara) make very good cakes!” But she was swiftly responded to with “Do not worry! Our sweets are so good that the gentlemen will be arrepiados!”

These soft gluten-free almond biscuits only require 5 ingredients and are a perfect complement too coffee. The best part? They only take 10 minutes to prep and another 10 minutes to bake, and are so superdelicious!

What you’ll need

(Makes about 15 biscuits)

  • 250g ground almonds
  • 90g light brown sugar
  • 1/2 tsp ground cinnamon
  • 2 eggs, beaten
  • grated zest of 1 lemon

How to make it

  1. Preheat the oven to 180 deg C/350 deg F.
  2. Mix all the ingredients until a stiff paste is formed
  3. Shape into little balls, then flatten on a baking sheet.
  4. Bake for about 10-15 minutes, until golden brown
  5. Leave to cool on baking sheet for 5 minutes, then transfer to a wire rack to cool immediately.

Guatemalan-Spiced Cacao Drink

A light alternative to iced/hot chocolate, this version of a traditional Guatemalan drink is light, aromatic and vegan. Made using raw cacao nibs, a highly nutritious superfood made from unsweetened and unroasted crushed cocoa beans, this healthy drink is exceptionally rich in antioxidants and minerals that help reduce inflammation.  It’s delicious, served cold or warm.

Fun fact: Considered the birthplace of chocolate, Guatemala and the cacao bean have a long history. More than 40% of the population of Guatemala is of Mayan descent, and the Maya deemed it ‘the food of the gods’.Both the cacao and beverage were used in a variety of religious rituals honouring the Mayan gods, and the Maya even had a god of cacao! Even until today, cacao is still traditionally served as a drink in Guatemala rather than eaten.

What you’ll need

(Serves 2)

  • 45g cacao nibs
  • 4 cloves
  • 1 cinnamon stick
  • 10 black peppercorns
  • 30g muscovado sugar (if you prefer less sweet) or 50g (if you like very sweet)
  • 500ml water
  1. How to make it
  2. Heat a small skillet over medium heat, then dry fry cocoa nibs for a few seconds until fragrant. Transfer to a bowl.
  3. Add the cloves, cinnamon and black peppercorns and toast lightly for a few seconds until fragrant. Remove from the pan, let cool slightly then grind to a fine powder in either a spice grinder (or coffee grinder).
  4. Add the cacao nibs and grind the mixture to a fine powder. You will do this in 2-3 batches.
  5. Heat 500ml water in a small saucepan over high heat, add sugar and stir to dissolve. Bring to the boil, then reduce the heat and add the cacao/spice mixture.
  6. Whisk vigorously to combine, then strain before drinking if you prefer a smoother texture.

Rose, Pistachio and White Chocolate Cookies

Inspired by Persian flavours, these shortbread cookies are fragrant, buttery but light — the perfect accompaniment to a cup of tea. The best part? They are simple to prepare and the dough can be made ahead of time and frozen.

Fun fact: Both rosewater and pistachio are thought to have originated from Iran and are commonly used in Middle Eastern cuisine. In Iranian, pistachios are called “the smiling nut” because the split shell resembles a smile. We hope these delightful cookies will bring a smile to your face.

What you’ll need

(Makes 12-15 cookies)

  • 115g unsalted butter, room temperature
  • 50g granulated sugar
  • 145g all purpose flour
  • 1/2 tsp vanilla extract
  • 1/2 tsp rose water
  • one pinch salt
  • 2 tbsp dried rose petals, slightly crushed
  • 1/4 cup white chocolate
  • 1 tbsp pistachios, finely chopped

How to make it

  1. Preheat oven to 180 deg C/350 deg F. Line a baking sheet with baking/parchment paper and set aside.
  2. Beat butter with sugar. With mixer on low speed, add flour, vanilla, rose water, salt, rose petals, white chocolate and pistachios until you get a crumbly dough.
  3. Shape the dough into a flat disc and wrap in plastic wrap. Refrigerate for 30 minutes.
  4. Roll out half the dough in between two sheets of parchment paper until it is 1/4 inch thick. Place in the freezer for 5 minutes. Cut the cookies out with your cookie cutter.
  5. Place the cookies onto the parchment-lined baking sheet 1 inch apart. Bake for 20 minutes or until the edges of the cookies just start to brown. Cool completely on a rack.
  6. Best enjoyed with a pot of rosebud tea.

Mini Cherry Pies

These bite-sized pies, made with buttery crumbly pastry, will melt in your mouth. They are delicious served still hot from the oven, eaten as they are or served with a drizzle of custard or spoonful of vanilla ice-cream. A perfect summer treat, they make a delightful breakfast, brunch, lunch or dessert!

What you’ll need

For Shortcrust Pastry:

  • 300g plain flour, plus extra for dusting
  • 180g unsalted butter, chilled and diced
  • 3/4 tsp Sugar
  • one pinch of salt
  • approx 150g ice cold water

For Mini Cherry Pies:

  • Butter for greasing
  • 350g cherries, stoned and half
  • 2 tsps cornflour
  • 3 tbsps caster sugar
  • 1 tsp vanilla extract
  • 1/2 tsp ground cinnamon
  • Shortcrust pastry
  • Plain flour, for dusting
  • Eggwash

How to make it

For Shortcrust Pastry:

  • Using a food processor, pulse butter flour, sugar and salt until the mixture resembles coarse breadcrumbs. Add water, a little at a time, and mix until a smooth dough is formed.
  • Place dough on a floured surface and knead lightly. Leave to rest in the fridge overnight.

For Mini Cherry Pies:

  1. Preheat the oven to 180 deg C/350 deg F. Lightly grease a 4×6 section mini muffin tins.
  2. Stir stoned cherries with cornflour, sugar, vanilla extract and cinnamon.
  3. Roll half the pastry out thinly on a lightly-floured surface. Using a fluted cookie cutter, stamp out 24 circles. Press gently into prepared tins, rerolling the trimmings as needed.
  4. Brush the top edges of the pie cases with a little of the egg glaze, then spoon in the filling.
  5. Roll the reserved pastry out thinly on a lightly-floured surface, then stamp out desired shapes and arrange over the pies. Brush with eggwash.
  6. Bake in the preheated oven for 15 minutes, or until golden.Leave to cool in the tins for 10 minutes, then loosen with a round-bladed knife and transfer to a wire rack to cool.
  7. Serve warm, or cold, sprinkled with cinnamon sugar, custard or vanilla ice-cream.

Greek Beef Stew with Orzo

A classic dish served in Greek homes for Sunday dinners, Giouvetsi/Youvetsi is a hearty stew made with meat and pasta, and flavoured with red wine, tomato sauce, cinnamon, cloves and bay leaves. Orzo absorbs the flavour from the beef stew, resulting in a mouth-watering one-pot meal that packs a punch!

What you’ll need

  • 900g/2 pounds beef chuck cut in large chunks
  • 4 tablespoons cooking oil
  • 1 onion, chopped
  • 1 large leek, chopped
  • 1 carrot, grated
  • 1 cup red wine
  • 2 bay leaves
  • 3 cloves
  • 1 star anise
  • 1 cinnamon stick
  • 1/4 cup tomato paste
  • 2 cups pureed tomatoes
  • 1 cup beef or chicken broth
  • 2 tbsps olive oil
  • 2 cups orzo pasta
  • Boiling water
  • Salt and pepper, to taste

How to make it

  1. Bring the beef to room temperature and pat dry with kitchen towel.
  2. In a casserole, dutch oven or claypot, heat the oil over high heat and brown the beef cubes.
  3. Remove the beef, then reduce the heat to medium.
  4. Saute the onion, the leek, the carrot, the bay leaves, the cinnamon stick, the cloves and star anise until the vegetables are softened. Season with salt and pepper.
  5. Add the beef back to the pot, then add the wine.
  6. Turn on the heat and evaporate most of the wine.
  7. Add the broth, tomato paste and tomatoes .
  8. Cover and simmer on low heat for until beef is tender (about 1 to 2 hours, depending on the beef cut).
  9. Pre-heat oven to 200 deg C/ 390 deg F.
  10. Stir in the orzo pasta and olive oil. If mixture is too dry, add some boiling water so the pasta can get cooked properly.
  11. Cover the casserole then bake in oven for 20 minutes.
  12. Remove casserole from the oven and rest for 20 minutes to let the pasta cook completely and absorb more liquid.
  13. Serve with crumbed feta cheese and a glass of red wine. Enjoy your meal!

Triple Chocolate Baileys Tart

Get your chocolate, coffee and boozy fix all at once with this showstopping and yummilicious tart! Comprising a chocolately tart shell, a Baileys-infused and chocolate-chip stuffed vanilla custard centre and a Baileys-infused chocolate ganache, this recipe makes an indulgent dessert and impressive centrepiece!

Perfect when paired with Baby Stout (recipe at bottom) – a delicious shot of Baileys Irish Cream and Patron XO Cafe.

What you’ll need :

Makes one 22cm tart or two 11.5cm tarts

For Chocolate Tart Shell

  • 60g cold unsalted butter (cubed)
  • 100g pastry flour
  • 1 tbsp cocoa powder
  • 1/4 tsp sugar
  • 1/8 teaspoon salt
  • 50g ice cold water
  • Egg wash

For Vanilla-Baileys & Chocolate Chip Custard

  • 1/2 cup milk
  • 1/8 cup cream
  • 2 egg yolks
  • 1 tbsp sugar
  • pinch of salt
  • 1tbsp all purpose flour
  • 1 strip lemon peel
  • 1 small cinnamon stick
  • 1/2 teaspoon vanilla extract
  • 2 tbsps Baileys Irish Cream
  • 2 tbsps chocolate chips

For Baileys Chocolate Ganache Filling

  • 80 ml heavy whipping cream
  • 100g semi-sweet chocolate
  • 2 tbsps Baileys Irish Cream

How to make it:

Chocolate Tart Shell

  1. Combine butter and flour in a plastic bag. Place in freezer overnight.
  2. Using a food processor, pulse butter and flour mixture, sugar and salt until the mixture resembles coarse breadcrumbs. Add water and mix until a smooth paste is formed.
  3. Place dough on a floured surface and knead lightly. Knead dough to rest in the refrigerator overnight.
  4. Roll out dough to a thickness of 5mm on a floured surface, then place dough over the tart tin. Gently press dough into the tin, along the sides and bottom. Roll the rolling pin over the top to remove excess dough, then prick dough with a fork, then rest in freezer for at least 5 minutes.

Vanilla-Baileys & Chocolate Chip Custard

  1. Preheat oven to 180 deg C/ 350 deg F
  2. In a large bowl, whisk milk, cream, egg yolks. sugar and salt. Carefully whisk in flour to prevent lumps. When the batter is smooth, add the lemon peel, vanilla and cinnamon stick.
  3. Transfer the batter to a saucepan and whisk constantly over low heat, until the mixture resembles thick custard and coats the back of a spoon.
  4. Allow to cool, then gently spoon off the milk skin from the top. Remove the lemon peel and cinnamon stick.
  5. Stir in Baileys and chocolate chips and mix well

Bake The Tart

  1. Brush top and edges of tart shell with egg wash.
  2. Pour Vanilla-Baileys & Chocolate Chip Filling into frozen chocolate tart shell, and bake for 15-20 minutes until custard is set.
  3. Remove from heat and leave to cool on a wire rack.

Chocolate Ganache

  1. As the tart cools, make the chocolate ganache.
  2. Break chocolate into small pieces and place in a medium sized bowl.
  3. Heat cream to a simmer (before it boils) and pour the hot cream over the chocolate. Add Baileys and whisk vigorously until you get a smooth consistent, creamy mixture.
  4. Leave to cool completely, before spreading or piping over the tart.

Final Touches

  1. Place in the refrigerator to set.
  2. Garnish tart with your preferred decorations.
  3. Best paired with a shot of Baby Stout!

Baby Stout Recipe

Pour 20 ml Patron XO Cafe into a shot glass and top with 40ml Baileys Irish Cream, layering the shot so it resembles a miniature glass of stout. Cheers!

Black Glutinous Rice Dessert – 3 Ways

Black glutinous rice, also known as black sticky rice, is the unpolished, whole grain of traditional sticky white rice. Despite its name, the colour of the rice is a deep, dark purple.

It has a nutty, chewy texture and has a natural sweetness. Unlike common white rice varieties, black rice is unprocessed, and healthier with more nutritional benefits. Its fibre-rich bran aids digestion, and it’s got more antioxidants and vitamin E compared to a similar amount of blueberries. Its deep purple hue contains anthocyanins, a powerful agent in fighting cancer and heart disease.

Usually enjoyed as a sweetened dish served with coconut milk in Southeast Asia, black glutinous rice commonly exists in the form of Bubur Pulut Hitam (black glutinous rice porridge) in Indonesia, Malaysia and Singapore, and Khao Neow Dam (black sticky rice) in Thailand.

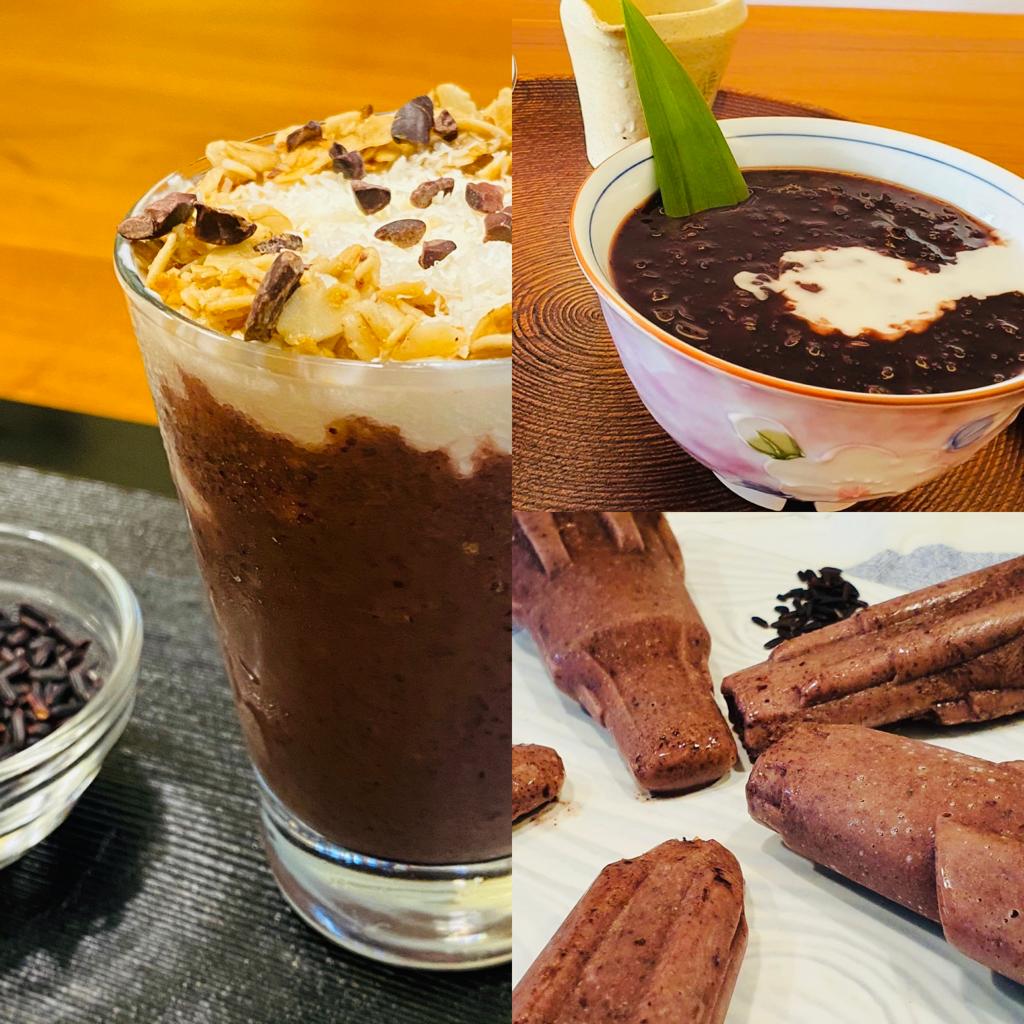
Using a basic Bubur Pulut Hitam recipe there are 3 different ways you can enjoy this healthy, gluten-free and no-bake dessert — warm, chilled as a wonderful chia seed pudding or frozen as popsicles.

Dessert 1: Bubur Pulut Hitam (Black Glutinous Rice Porridge)

What you’ll need

(Serves 2-4)

  • 1 cup (180g) black glutinous rice
  • 5 cups water
  • 1 small block palm sugar (can be substituted with 90g brown sugar)
  • 4 pandan leaves, tied into knots
  • ¾ cup coconut milk
  • ¼ teaspoon salt

How to make it

  1. Soak and wash the black glutinous rice thoroughly until the water runs clear. If possible, cover in water and soak overnight.
  2. Add the pandan leaves and water. Bring to a boil.
  3. Boil covered for 40 minutes over medium heat.
  4. Meanwhile, melt palm sugar over low heat. Add the palm sugar into the porridge and mix well.
  5. Turn the heat down to medium-low and boil for another 10 to 15 minutes.
  6. Add the salt, stir and let the mixture come to a simmer. Turn off the heat.
  7. Drizzle coconut cream when serving. Serve warm or cold.

Dessert 2: Black Glutinous Rice Chia Seed Pudding

What you’ll need

  • Black glutinous rice porridge (recipe #1, as above)
  • 1/2 cup coconut milk
  • Chia seeds
  • Granola
  • Yoghurt

How to make it

  1. Blitz porridge in blender with coconut milk
  2. Pour into small glasses and add 1 tablespoon of chia seeds per glass
  3. Chill mixture for at least 20 minutes, then top with granola and yoghurt, while serving.

Dessert 3: Black Glutinous Rice Popsicles

What you’ll need

  • Black glutinous rice porridge (recipe #1, as above)
  • 1/2 cup coconut milk

How to make it

  1. Biitz porridge in blender with coconut milk
  2. Pour into popsicle molds and freeze overnight.
  3. Enjoy!

Notes:

  • Wash and rinse the rice thoroughly before washing
  • Palm sugar gives the dessert a fragrant, aromatic taste, but can be replaced with brown sugar as a subsititute
  • The coconut milk adds a creamy texture to the dessert and the amount can be varied, according to personal preference.

Purple Cabbage Garden Focaccia

Add a healthy boost and positively purple vibes to your focaccia! Enriched with the pure goodness of purple cabbage (also known as red cabbage) juice, this beautiful flower garden focaccia is like no other.

A good source of potassium, folate and vitamin K, purple (red) cabbage has 10 times more vitamin A than green cabbage! Armed with a host of benefits for heart, brain and vision health, the cabbage adds a flavoursome aroma to the focaccia while its enzymes will give your dough an extra fluffy texture.

What you’ll need

  • 1 + 1/4 cup purple cabbage juice + 1 tbsp lemon juice + 1 tbsp sugar (room temperature)
  • 3 cups bread flour
  • 2 teaspoons yeast
  • 1 teaspoon salt
  • 2 teaspoons sugar
  • 2 tablespoons olive oil

For decoration: assorted vegetables and herbs including bell peppers, small onions, leek, tomatoes, olives, sage and basil

How to make it

  1. In a small bowl, combine yeast, sugar and 20ml cabbage juice. Set aside for 10 minutes.
  2. After 10 minutes, in a medium-large bowl, combine flour, salt, and yeast mixture. Stir well. Add the rest of the cabbage juice mixture. Mix until all of the flour is well incorporated (there should be no small pockets of flour.)
  3. Cover the bowl and leave in a warm place (preferably approximately 38 degree celsius) with a wet tea towel for about 40 minutes or until dough has doubled in size.
  4. Lightly oil a 9-inch square cake pan with olive oil. Roll out dough to fit into the pan. After 15 minutes, stretch dough out to fit the pan if it shrinks.
  5. Cover pan with plastic wrap/wet tea towel and allow the dough to rest till approximately doubled in size (about 30mins). The dough should cover the pan.
  6. Drizzle another tablespoon of olive oil over the dough. Use your fingers to press down into the dough to create deep dimples (approx 2 fingers apart).
  7. Unleash the artist in you and decorate the top with fresh herbs, vegetable and flaky sea salt.
  8. Brush herb and vegetables toppings thoroughly with olive oil to prevent them from being burnt.

Bake:

  1. Preheat oven to 375 deg F/190 deg C with a rack positioned in the centre of the oven. Bake for 18 to 20 minutes, until the tops are golden. Remove pan from the oven. Remove bread from the pan and transfer to a cooling rack.
  2. Serve warm or allow to cool completely.

Freeze:

  1. To freeze, allow bread to cool completely, then transfer to a ziplock bag and freeze. Thaw and enjoy at room temperature or warm for 10 minutes in a 350 deg F/180 deg C oven.

Chokladbollar

Swedish Chocolate Balls

It’s fika time! In Sweden the fika tradition is synonymous with taking a coffee break and having a snack with it. Even though they are commonly served in Swedish cafes, many Swedish families make Chokladbollar at home, because they are really easy to make. In fact, this is one of the first desserts Swedish children learn to bake during their childhood! This is a perfect no-bake gluten-free dessert, and you won’t be able to stop at one!

What you’ll need

  • 1 cup rolled oats, ground into a coarse meal
  • 1/2 cup unsalted butter (113 grams), softened
  • 40g granulated sugar
  • 3 tablespoons good quality cocoa powder
  • Optional: 1 teaspoon coffee powder
  • a pinch of salt
  • 1/4 cup dessicated coconut
  • 1/4 cup ground pistachios

How to make it

  1. Cream butter and sugar, then add cocoa powder and vanilla and cream until well blended.
  2. Stir in oats and salt
  3. Roll the mixture into small balls – about 1 tablespoon if you’d like them larger, about 1 tsp if you’d like them smaller.
  4. Roll half the balls in the dessicated coconut, and half the balls in the pistachio until fully coated
  5. Refrigerate for at least an hour, or freeze for 30 minutes before serving.
  6. Store in an airtight container. They will last in the fridge for a week or longer if kept in the freezer.

Notes:

  • Most Swedish recipes will call for coffee to be added, but this can be left out if you would like to make them more child-friendly
  • Get creative – add fillings like chocolate chips, caramel or coat the chocolate balls in rainbow sprinkles…!

Oreo & Chocolate Cheesecake

This tri-coloured, light and decadent cheesecake is the perfect weekend treat! It’s double the goodness when paired with coffee or a coffee-flavoured drink.

What you’ll need:

For the Oreo bottom:

  • 3/4 cup finely ground Oreo cookies
  • 2 tablespoons unsalted butter, melted

For the cheesecake:

  • 500g cream cheese, softened
  • 2/3 cup granulated sugar
  • 11/2 teaspoons pure vanilla extract
  • 2 large eggs. room temperature
  • 1 cup melted chocolate

For garnishing:

  • 4 oreo cookies (3 cookies quartered, 1 crumbed)

How to make it:

For the Oreo bottom

  1. Line 12 muffin cups on a muffin tray (foil liners are preferred over paper liners)
  2. Put cookie crumbs and butter in a small bowl and mix with a fork until the crumbs are evenly moistened.
  3. Portion the crumbs evenly among the liners, tightly. Chill in fridge while you make the filling.

For the cheesecake filling

  1. Melt chocolate in a bowl over a double boiler, set aside to cool at room temperature.
  2. Position an oven rack in the middle of the oven and heat to 300 deg F/150 deg C.
  3. Beat cream cheese on medium high speed until light and fluffy, and until there are no more lumps.
  4. Add sugar, vanilla and salt, and beat until well combined.
  5. Add eggs, one at a time, beating on medium speed until just combined.
  6. Scoop out 1 cup of the vanilla batter, set aside.
  7. Add melted chocolate to the remaining batter and stir until well blended.
  8. Portion the chocolate batter evenly among the prepared muffin cups.
  9. Portion the vanilla batter evenly among the cups. Make sure the cups are completely filled.
  10. Drag and fold the tip of a toothpick through the two batters in a swirled pattern so there are solid streaks visible.
  11. Tap muffin tin on the counter to settle the batters.
  12. Bake in preheated oven until the centres barely jiggle when the pan is nudged, about 20-22 minutes.
  13. Settle the muffin tin on a wire rack to cool completely
  14. Cover and refrigerate for at least 6 hours,
  15. Top with a quartered wedge of oreo cookie and some cookie crumbs.

Notes:

  • This recipe is best made at least a day before serving.