Brown Sugar Burnt Cheesecake

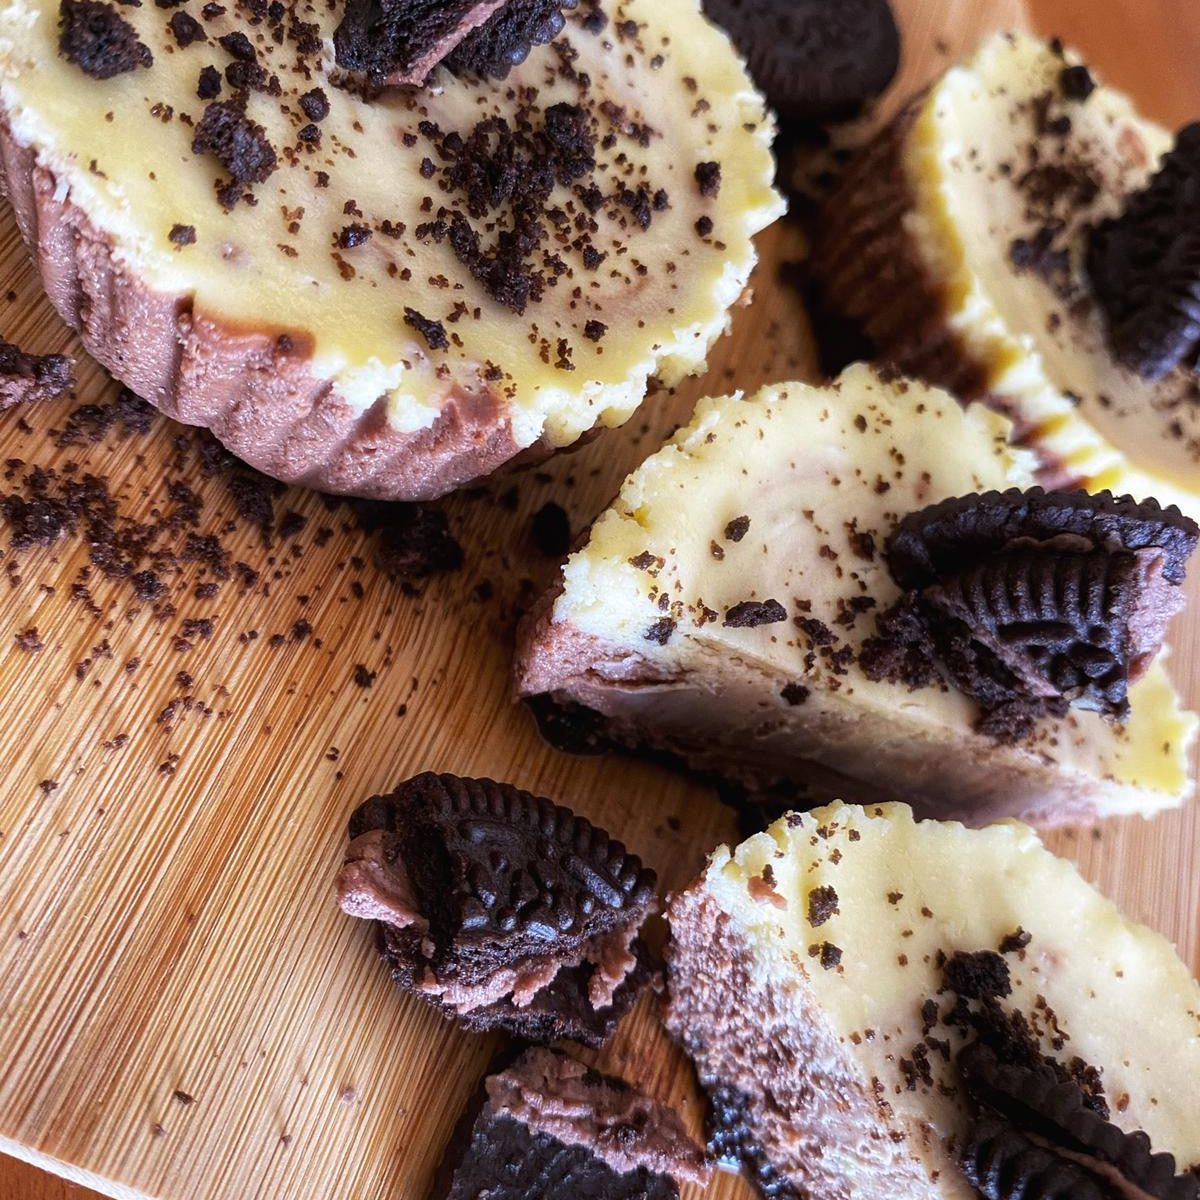
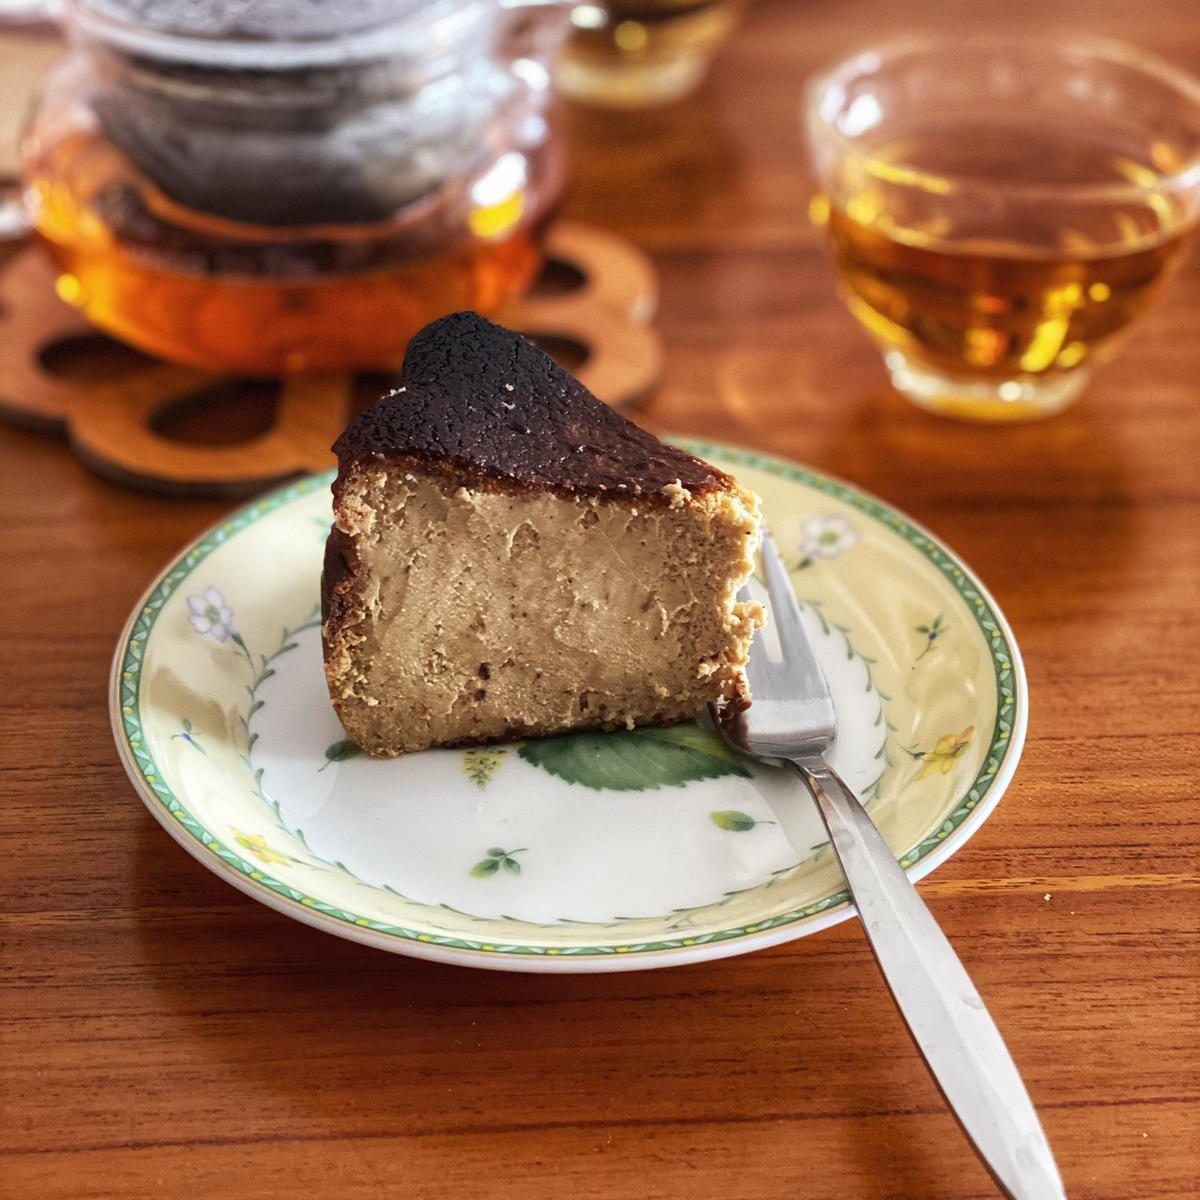
Wonderfully creamy and custardly, the Basque burnt cheesecake is a crustless cheesecake baked at high heat. It has a rustic look with cracked edges and an almost burnt surface.

While the original recipe from La Viña in San Sebastián contains only 5 ingredients, there’s plenty of room to get creative. This version uses brown sugar as well as Brie for an enhanced caramelly finish. You can also add matcha powder, cocoa powder, Camembert or Blue Cheese – so simply get creative and have some fun!

What you’ll need

  • 400g cream cheese, room temperature
  • 50g Brie
  • 80g brown sugar
  • 20g caster sugar
  • 3 large eggs, room temp
  • 200g heavy cream (35% fat)
  • 1 tbsp cornflour
  • 1 tbsp all purpose flour
  • 1 tsp vanilla extract
  • 1 tsp lemon juice
  • 1 tbsp rum


How to make it

  1. Line a 6” circle cake tin with 2 layers of baking paper and trimmed to have an overhanging amount of 1.5″-2″.
  2. Beat sugar and cream cheese together on medium until smooth and there are no more clumps. Scrape the bowl.
  3. Add eggs one at a time and beat on medium until smooth. Scrape the bowl again to ensure that nothing sticks to the sides for even mixing.
  4. Add the rum, vanilla, lemon juice, cream and beat until just mixed. Sieve the flours into the mixture and mix to ensure it’s just combined.
  5. Bake in convection oven at 220C/430F for at least 40 minutes, until top is dark amber and almost charred at parts but the middle is still jiggly.
  6. Let cool in the tin fully on a wire rack at room temperature, then place in fridge to allow the cheesecake to set. Serve cold or at room temperature.

Note: If you prefer a more runny/molten centre, bake the cheesecake at 240C/470F for 30-35 minutes.

Earl Grey Tea Scones + Cranberry Chocolate Chip Scones

Originally made with oats and griddle-baked, it is believed that scones got their start as a Scottish quick bread in the early 1500s. Some say the word “skone” originated from the Dutch word ‘schoonbrot’, which means beautiful bread, while others argue it comes from Stone of Destiny, where the Kings of Scotland were crowned.
 
When it comes to flavour variations, the possibilities are endless, so feel empowered to explore your favourite (preferably dry) ingredients! The important thing is to keep in mind are that all ingredients should be cold (e.g. use chilled or frozen butter) for a better rise, and don’t overdo the mixing because crumbly scones are best!

What you’ll need

  • 350g self raising flour, chilled
  • 1tsp baking powder, chilled
  • 75g unsalted butter, very cold and cubed
  • 150g cold milk
  • 70g sugar
  • For cranberry chocolate chip scones: 20g cranberries + 20g semi sweet chocolate chips
  • For Earl Grey tea scones: 2 tbsps Earl Grey tea dust
  • 2 eggs, beaten
  • pinch of salt

How to make it

  1. Rub together the flour, baking powder and butter,
  2. Mix in the sugar, eggs (save a little to glaze the scones) and milk.
  3. Divide into 2 sets.
  4. For set 1, add cranberries and chocolate chips.
  5. For set 2, add Earl Grey tea dust.
  6. Knead both to a dough consistency.
  7. Roll dough out to 2cm thickness, then cut out with rings on a floured workbench.
  8. Place on a baking tray with parchment paper.
  9. Brush with the remaining egg, and bake at 195 degC/380 deg F for 12 minutes.
  10. Enjoy with cream, jam and tea!

Chocolate Almond Roll

Despite its name, the Swiss Roll (also known as jelly roll, jam roll, roll cake, cream roll or Swiss log) did not originate from Switzerland but likely from Austria. From classic fruit jam, whipped cream, chocolate and cheese fillings, to more exotic fillings made with ube and durian, different countries have their favourite interpretations of this sponge cake roll.

This light and luscious Chocolate Almond Roll combines a simple 3-ingredient Swiss Roll sponge recipe with a delicious chocolate almond butter.

What you’ll need

For the Swiss Roll Sponge:

  • 3 Eggs
  • 60g Castor sugar
  • 50g All Purpose Flour, sifted twice

For the Chocolate Almond Butter Filling:

  • 1 cup raw almonds
  • 1/3 cup milk chocolate chips
  • 1 teaspoon coconut oil
  • 1 tablespoon cocoa powder
  • 1 tablespoon honey
  • 1 pinch sea salt

For the Topping:

  • 50g dark chocolate, broken into small pieces
  • 1 tbsp ground raw almonds

How to make it

Swiss Roll Sponge:

  1. Preheat oven to 200 deg C/400 deg F. Line a 28cm x 28cm flat square cake pan with parchment or baking paper.
  2. Using a clean bowl, beat eggs with a whisk, then add sugar. Place bowl over a double boiler and mix well.
  3. While egg mixture is warm, beat the mixture in a mixer on high speed with whisk attachment, until light and fluffy. Reduce speed to low and continue beating for a minute. This will stabilise the volume of the egg mixture and ensure less volume is lost when you fold in the flour later.
  4. Gently fold in sifted flour with a spatula, turning the bowl continuously and scooping the mixture up from the centre and bottom of the bowl. Fold until the mixture becomes glossy. Take care not to overmix the batter.
  5. Pour batter into pan and spread evenly with a scraper. Place cake pan on a tray and bake for 10-12 minutes. Baking the sponge on an additional tray will prevent the bottom of the sponge from browning too quickly.
  6. When Swiss Roll sponge is done, remove from oven, leave to cool slightly in pan, then and place in a plastic bag while it’s still warm to retain moisture. Alternatively, place a kitchen towel over it, and roll it up and set aside.

Chocolate Almond Butter Filling:

  1. Toast almonds, then add to a food processor and process for 10-15 minutes, scraping down the sides as necessary. At this point the almonds should start to clump together. Continue to process until you reach a buttery consistency consistency. I always process until my almond butter is liquid like.
  2. Melt chocolate chips in the double boiler.
  3. Add chocolate, cocoa powder, honey, and sea salt to almond butter and process again until smooth.

Assembling the Cake:

  1. Turn cool sponge onto a clean work surface. Peel off the parchment paper from the bottom of the sponge.
  2. Spread the chocolate almond butter in an even layer over the sponge, leaving 1-1.5cm all around the border.
  3. Gently roll up the sponge to make Swiss roll.
  4. Melt the dark chocolate in the double boiler.
  5. Drizzle melted chocolate over the Swiss roll, top with ground almonds.
  6. Chill in the fridge for a few hours to allow the Swiss roll to set. Slice into pieces and tuck in!

Oreo & Chocolate Cheesecake

This tri-coloured, light and decadent cheesecake is the perfect weekend treat! It’s double the goodness when paired with coffee or a coffee-flavoured drink.

What you’ll need:

For the Oreo bottom:

  • 3/4 cup finely ground Oreo cookies
  • 2 tablespoons unsalted butter, melted

For the cheesecake:

  • 500g cream cheese, softened
  • 2/3 cup granulated sugar
  • 11/2 teaspoons pure vanilla extract
  • 2 large eggs. room temperature
  • 1 cup melted chocolate

For garnishing:

  • 4 oreo cookies (3 cookies quartered, 1 crumbed)

How to make it:

For the Oreo bottom

  1. Line 12 muffin cups on a muffin tray (foil liners are preferred over paper liners)
  2. Put cookie crumbs and butter in a small bowl and mix with a fork until the crumbs are evenly moistened.
  3. Portion the crumbs evenly among the liners, tightly. Chill in fridge while you make the filling.

For the cheesecake filling

  1. Melt chocolate in a bowl over a double boiler, set aside to cool at room temperature.
  2. Position an oven rack in the middle of the oven and heat to 300 deg F/150 deg C.
  3. Beat cream cheese on medium high speed until light and fluffy, and until there are no more lumps.
  4. Add sugar, vanilla and salt, and beat until well combined.
  5. Add eggs, one at a time, beating on medium speed until just combined.
  6. Scoop out 1 cup of the vanilla batter, set aside.
  7. Add melted chocolate to the remaining batter and stir until well blended.
  8. Portion the chocolate batter evenly among the prepared muffin cups.
  9. Portion the vanilla batter evenly among the cups. Make sure the cups are completely filled.
  10. Drag and fold the tip of a toothpick through the two batters in a swirled pattern so there are solid streaks visible.
  11. Tap muffin tin on the counter to settle the batters.
  12. Bake in preheated oven until the centres barely jiggle when the pan is nudged, about 20-22 minutes.
  13. Settle the muffin tin on a wire rack to cool completely
  14. Cover and refrigerate for at least 6 hours,
  15. Top with a quartered wedge of oreo cookie and some cookie crumbs.

Notes:

  • This recipe is best made at least a day before serving.

Cempedak Muffins

Cempedak Muffins

Often called the ugly cousin of the jackfruit, cempedak is a tropical superfruit native to Southeast Asia Malaysia, Indonesia, Thailand, Myanmar and Vietnam 

Cempedak’s aromatic, custard-like flesh can be eaten fresh or cooked — it can be fried or its pulp creamed to make jams and cakes. Its hard seeds are also edible – boiled, roasted or deep fried like tempura.

Known for a wide range of health benefits, this fruit is rich in vitamins and minerals, and is known for its cancer-preventing and eye-nourishing properties. 

What you’ll need

  • 120g of unsalted butter, room temperature
  • 3/4 cup of castor sugar
  • 2 eggs
  • 2 cups all purpose flour
  • 1.5 tsp baking powder
  • 0.5 tsp salt
  • 1.5 cups cempedak puree
  • Half cup milk

How to make it

  1. Preheat oven to 180 deg C/ 350 deg F.
  2. Sift flour, salt and baking powder together in a bowl.
  3. Beat sugar and butter till light and fluffy.
  4. Add in eggs, one at a time.
  5. Beat until light and fluffy.
  6. Fold in flour mixture and milk, alternating between both, until well combined.
  7. Mix in 1 cup of cempedak puree.
  8. Spoon batter into muffin cups then top with a teaspoon of cempedak puree and cover again with a bit of batter.
  9. Bake in the oven for 20 mins or longer until a skewer inserted in the middle of a muffin comes out clean.
  10. Cool on a wire rack and enjoy the aromatic taste!

Notes:

  • Cempedak puree can also be replaced with jackfruit
  • If using canned jackfruit, get the yellow (instead of green) jackfruit and reduce sugar in recipe.

Goji Berry and Carrot Cupcakes

Goji Berry (wolfberries) and Carrot Cupcakes

This child-friendly, nutrient-dense carrot cake recipe is enhanced with the addition of goji berries, or wolfberries. Often called a superfood, goji berries are packed with a whole load of nutrients. Containing all eight essential amino acids and a high levels of healthy antioxidants, Goji berries are known for their anti-aging effects, and benefits to eye and immune health.

What you’ll need

  • 1 cup unbleached all-purpose flour
  • 1/2 tsp ground cinnamon
  • 1/2 tsp salt
  • 1 tsp baking powder
  • 1 tsp baking soda
  • 2/3 cup vegetable oil
  • 1/3 cup firmly packed light brown sugar
  • 4 eggs
  • 2 medium sized carrots, scrubbed and shredded
  • 1/3 cup goji berries

How to make it

  1. Preheat oven to 350 deg F/ 180 deg C.
  2. In a bowl, sift together flour, cinnamon, salt, baking powder and baking soda.
  3. In a separate bowl, beat oil, brown sugar and eggs together well.
  4. Add sifted ingredients and mix only until just combined. Fold in grated carrots and goji berries.
  5. Line a 12-cup muffin (or 24-cup mini muffin) pan. Fill cups two-thirds full and bake for 20-25 minutes (15-18 minutes for mini muffins) or until a toothpick inserted in the centre comes out clean.
  6. Remove tin from oven and cool for 10 minutes
  7. Remove cupcakes from tin and allow to cool before serving or frosting.
  8. Keep in the fridge in an airtight container for several days

Notes:

  • We used a mix of purple and orange carrots, either can be used.
  • As this cupcake is oil-based, it can be eaten straight out of the fridge.

Lapis Legit/Kue Lapis/Thousand Layer Cake

Kueh Lapis (Thousand Layer Cake)

Lapis Legit, also known as the “thousand layer cake”, literally means “sweet layer cake” in Indonesian.

This delicate and delicious cake was first introduced to Indonesia during its Dutch colony days, and ironically can hardly be found in Holland today.

Ultimate patience is key to creating this masterpiece, comprised of 15-20 layers, baked layer upon layer. A complicated process indeed but well worth the effort, for it brings both the baker and gourmet lover absolute delight when making its grand entrance.

Its ingredients are as noteworthy as its elegant look – a high ratio of butter and eggs to flour, and an eclectic mix of spices, including cardamom, cinnamon, clove, nutmeg and anise. Because of its rich decadence (aka high fat content), thin slices are usually served, often as a snack, and to be enjoyed with tea and coffee.

Makes 1x20cm (8 inch) square cake

What you’ll need

  • 250 g high quality Dutch butter (cold and cut into pieces, plus extra to butter the layers while baking)
  • 10 egg yolks
  • 8 egg whites
  • 1 1/2 cups caster sugar
  • 185g cake flour, sifted
  • 1/2 tsp baking powder
  • 1 tsp ground cardamom
  • 1 tsp ground cinnamon
  • 1 tsp ground nutmeg
  • 1/2 tsp ground cloves
  • 3 tbsp rum
  • 2 tsps vanilla essence

What to do

  1. Pre-heat the oven to 160 degrees/ 325 degrees F.
  2. Generously butter the cake pan, then line the base with baking paper and brush with melted butter. Dust with flour and tip out excess.
  3. Sift flour and spices together.
  4. Egg yolk mixture: Whisk egg yolks with 1/2 cup sugar until light and thick
  5. Butter mixture: Cream butter with 3/4 cup sugar, rum and vanilla
  6. Meringue mixture: Whisk egg whites on medium speed till foamy, then add rest of sugar and whisk until stiff peaks form
  7. Mix egg yolk and butter mixtures together
  8. Fold in flour, followed by the meringue mixture
  9. Measure approximately 1/3 cup of batter and spread onto the baking tin with a spatula. Tap the tin to remove air bubbles and also to ensure a thin, even layer. Bake the first layer until firm, about 10 minutes.
  10. Turn the oven to grill mode, then grill until brown, about 30-40 seconds.
  11. Brush with butter.
  12. Spread a second layer, tap the tin, cook for 10 minutes and repeat the above process for all subsequent layers until all the cake batter is used up.

Notes:

  • Between each layer, press the cake down well using a spatula or fondant press.
  • If you spot any air bubbles as you are baking the layers, poke them with a toothpick
  • Let the flavours continue to develop and it will taste best after 3-4 days.
  • Store at room temperature for up to 1 week or in the fridge for 3 weeks.